Bilding a mental rotation task in Psychopy
In this tutorial we are going to show how to implement a mental rotation task in Psychopy.
Background
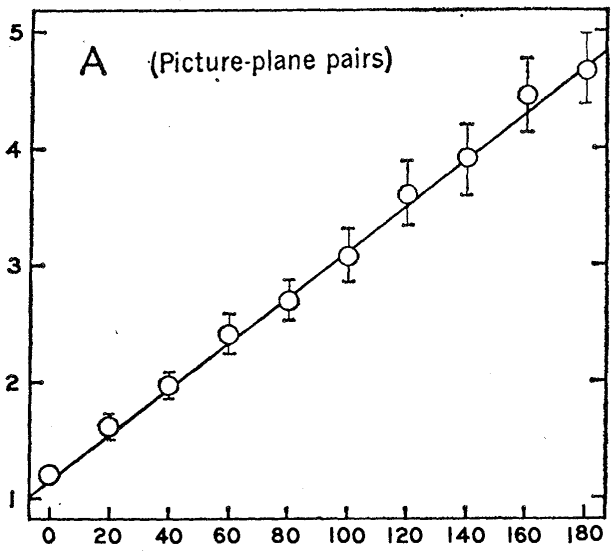
The mental rotation task was originally developed by Shepard and Metzler (1971) and is still today one of the most commonly used tasks to investigate the cognitive manipulation of mental images. In the original study, participants were presented with 3D shapes.
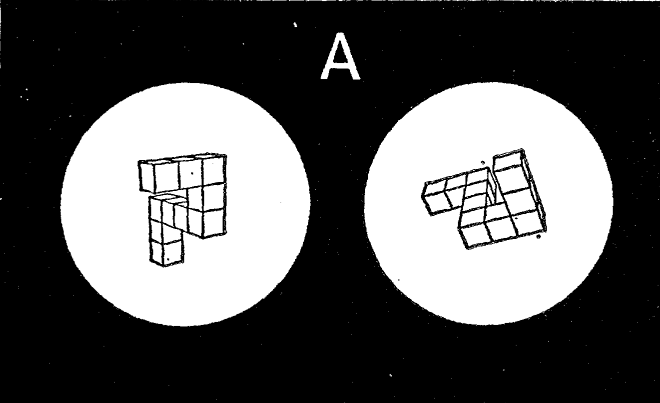
In each trial, participants were presented with two shapes which could have been the same objects shown at different angles, or two different objects (one the mirrored version of the other). The task was to report whether the two shapes were the same or not. The hypothesis is that people need to mentally rotate one image to verify whether it matches the other. The higher the rotation angle between the two images, the longer it should take to complete the task. Indeed, the authors observed a linear relationship between the participants’ reaction times and the rotation angle.
Building in Psychopy
For this tutorial, we will implement a two-dimensional version of the mental rotation task. The reason for this is that the three-dimensional version would require us to create images of the stimuli and then present them on the screen. This means we would work mostly outside Psychopy, which would not be helpful. Instead, a two-dimensional version allows us to create the stimuli directly in Psychopy, allowing us to delve into this software a little bit more. In our version of the task, we will use letters as stimuli. In each trial, two letters will be presented on the screen, one on the left and one right side of the screen. The stimuli can be either the same letter rotated at a specific angle or a mirrored copy of each other, again rotated at a particular angle. In this way, we obtain two main conditions:
- Same condition: the two stimuli are the same letter, and it is possible to verify this by rotating one stimulus so as to match the other
- Mirrored condition: although representing the same letter, the two stimuli cannot be matched by a simple rotation. The only way to match them is by flipping one letter, which is not allowed in this task.
In the following sections, we will start by creating two simple stimuli, then we will deal with rotating them, and finally, we will introduce all the different conditions (angles and whether the stimuli are mirrored or not). As a cherry on top, we will use some simple code to fix a bug that, unfortunately, is present in Psychopy’s text stimulus.
Before we get started, let’s have an overview of Psychopy.
Psychopy overview and preliminaries
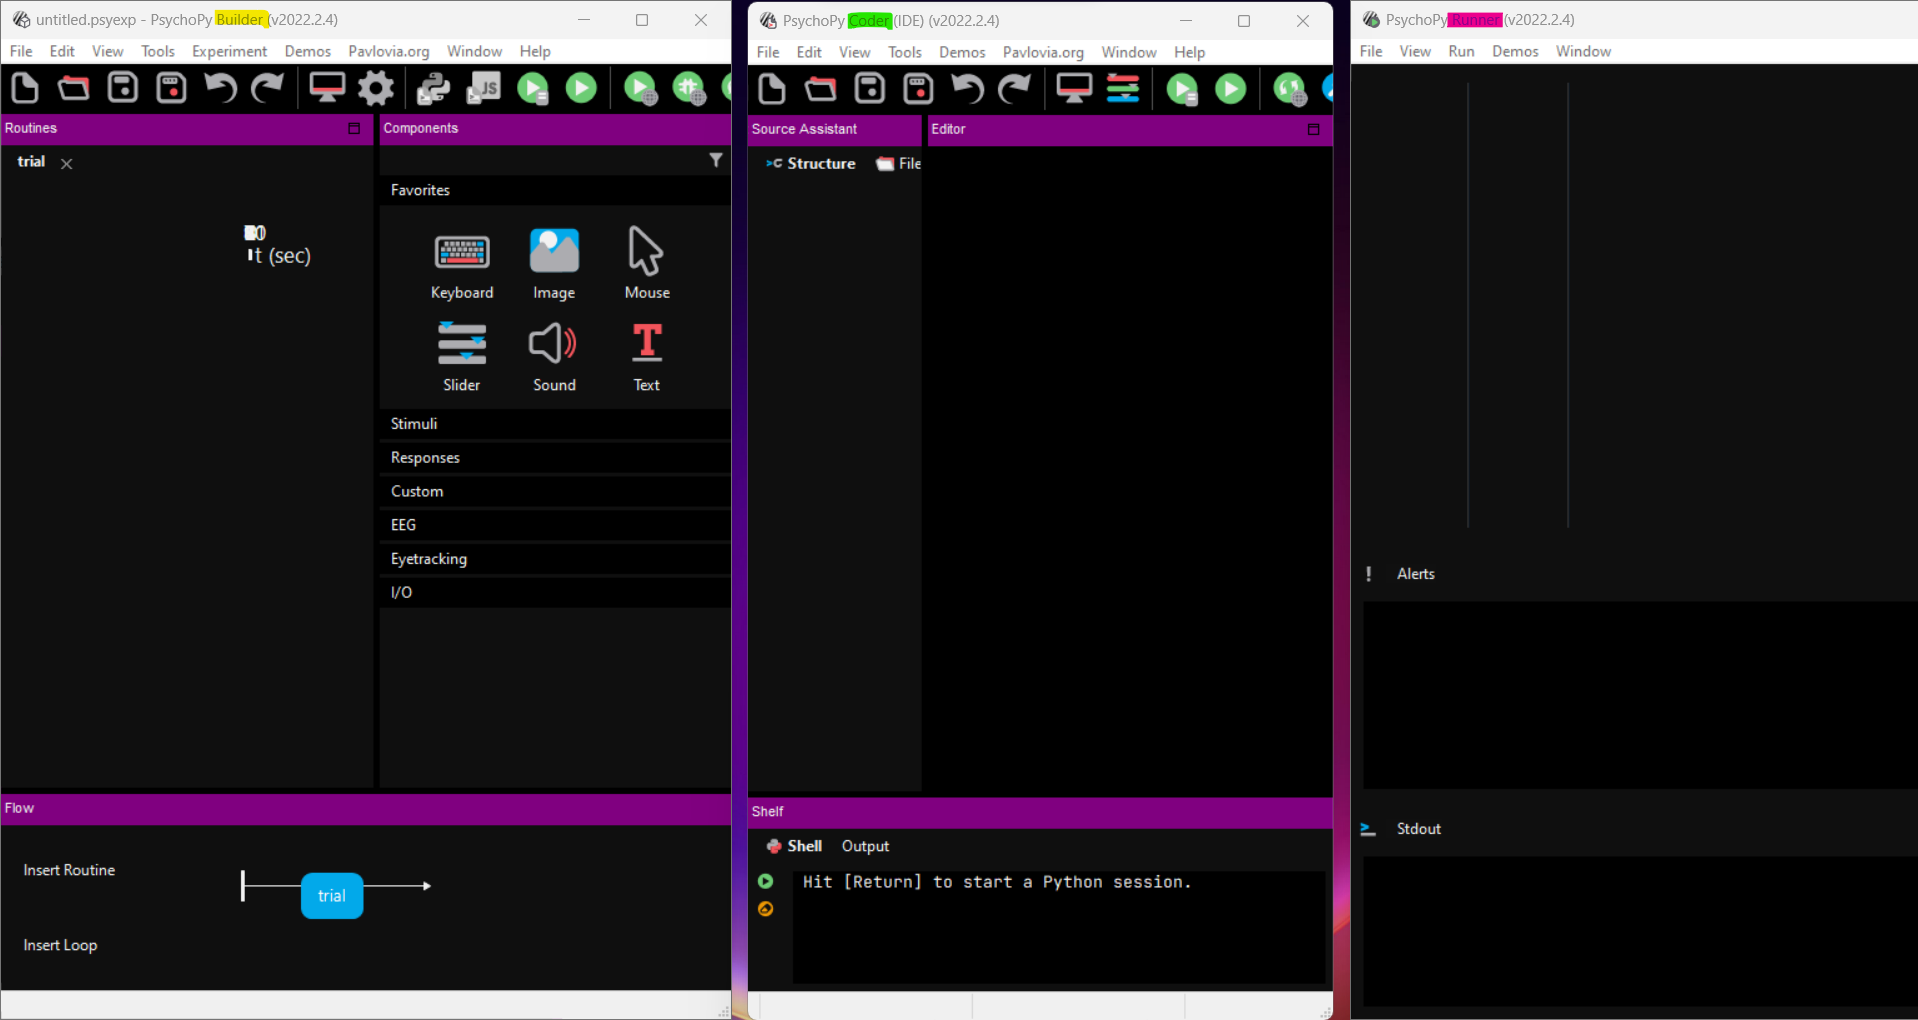
When we open Psychopy we get three windows:
- Builder (aka GUI - left)
- Coder (where the Python code is compiled - centre)
- Runner (where some useful information is presented when the experiment is run - right)
For now, we only need the builder window, so close the coder and the rummer windows.
The builder section has three major areas: 1. Routines: this is the central part of the window. Here you will see all the elements that will be presented at each step of the experiment 2. Components: the panel on the right. Here you can find all the built-in elements that you can use to create your experiment. Please take some time to look at them, oftentimes what you need for your study is already there 3. Flow: the panel at the bottom. Here you see, well, the flow of your experiment.
You can think of a study as being composed of different steps. For instance, an introduction, where you instruct the participant about what to do. A training section, where the participant completes some mock trials to get accustomed to the experiment. A test session, where the participant is presented with real trials, and you collect some data. Finally, a conclusions section, where you thank the participant and possibly debrief them. The way in which this section and its elements are presented is the flow of the experiment.
If we zoom in on one section, let’s say the test section, we could imagine this being composed of a series of steps. For instance, each trial might start with a fixation cross. This might be followed by the presentation of a stimulus and by an interstimulus period with a randomized duration. Each of these elements could be implemented as its own routine (note that you could also implement all the elements in one routine, although sometimes this is a more challenging approach). Thus, you could see a routine as a section of the experiment with its own elements, aka components and its own parameters.
Each experiment can be implemented in multiple ways, using a different number of components and routines. Finding the best approach for a given experiment might take some time, so don’t worry if you have to change your initial implementation.
Define a monitor
At the top of the builder window, you can see some icons. Some of these are very important, especially the one that looks like a monitor (Monitor settings and calibration) and the one that looks like a gear (Edit experiment settings). We use these to tell Psychopy all the relevant information regarding the monitor where we present the experiment and the general settings of the experiment. Indeed, before we start even creating the experiment, it is good practice to specify the monitor we are using. This means setting the screen’s dimensions (width and height) and how far away the participant will sit from it. This is crucial as it influences how the stimuli are presented.
To define the monitor, click on Monitor settings and calibration. A new window will appear. We will focus only on the left side of this window. On the top part, under the Choose monitor section, click on new and enter a name for the monitor you want to use. This can be the brand of the monitor, where the monitor is located, etc…
I created two monitors here: my home monitor for when I work at home and my office monitor, for when I work in the office. Once you are happy with the name, click OK and make sure that the new monitor is now highlighted. If not, click on it. With the monitor name highlighted, we can now define the monitor specifications. In the bottom left half of the window, under Monitor info, we can define a few parameters:
- Screen distance: how far away, in cm, your participant will be located from the screen (PLEASE SET THIS TO 57 CM!)
- Size: the resolution of the monitor in pixels
- Screen width: width of the screen in centimetres
Here you can see the parameters for my home monitor.
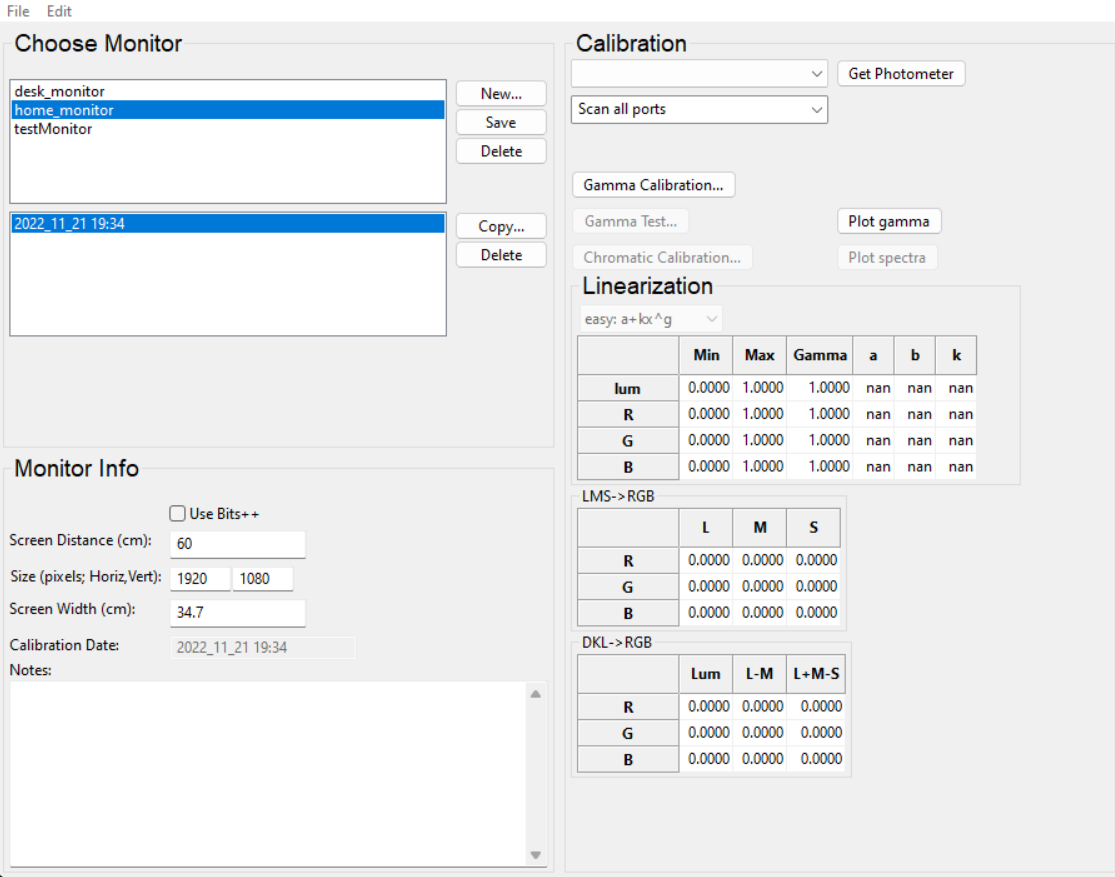
Now we need to tell Psychopy to use this monitor, otherwise it will automatically default to the default one. To do this, click on save in the Choose monitor section of the monitor settings window and then close this. Now, click the gear icon (Edit experiment settings) and switch to the Screen tab. At the very top, there is a field called Monitor. By default, it contains the name of the Psychopy default monitor (testMonitor). Replace this with the name of the monitor you just created and click OK.
If you use more than one screen, you will also need to set up the screen number with the screen you want to use. Just click on Show screen numbers and replace the value with the correct number. Now Psychopy should use your brand new defined monitor.
We will see more settings later, but now let’s get started with the experiment.
Presenting the target stimulus
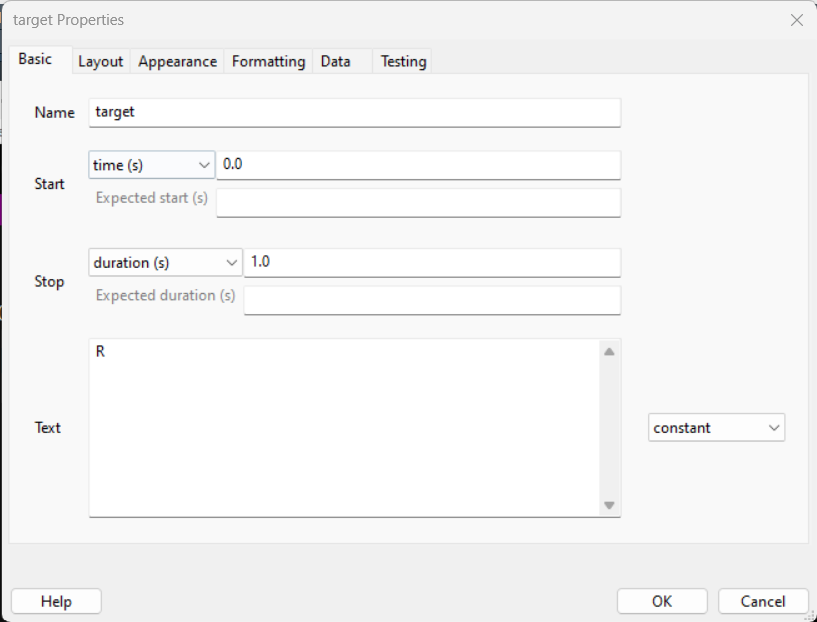
In the flow section, you can see one “box” called trial. This box is a routine, and Psychopy gives you one by default to work with. Later we will add more routines, but for now, let’s work on this. We said we would use the letter R as a stimulus. To present a letter, we can add a text component to our routine. To do so, on the component panel on the right, click on the Text component under the Stimuli menu. This will open up a window like this, where you can define all the component parameters:
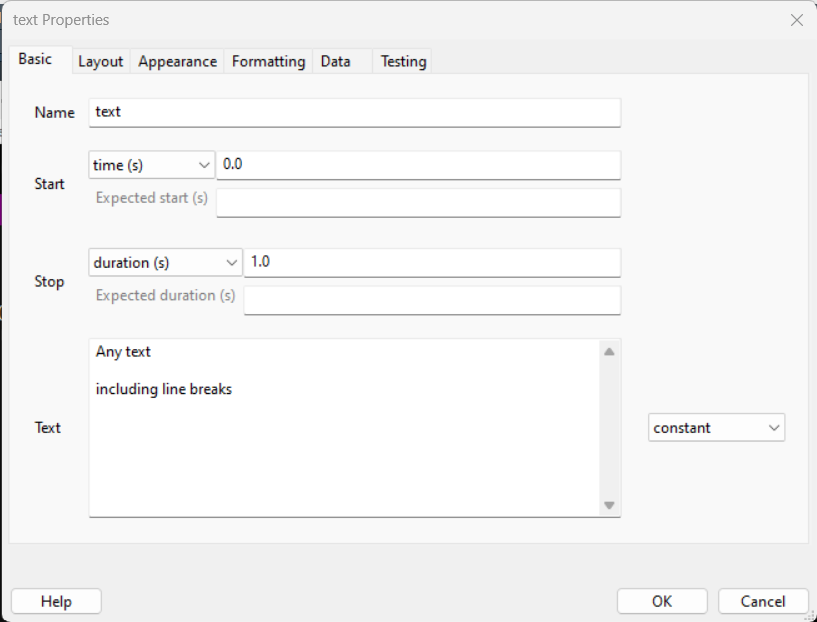
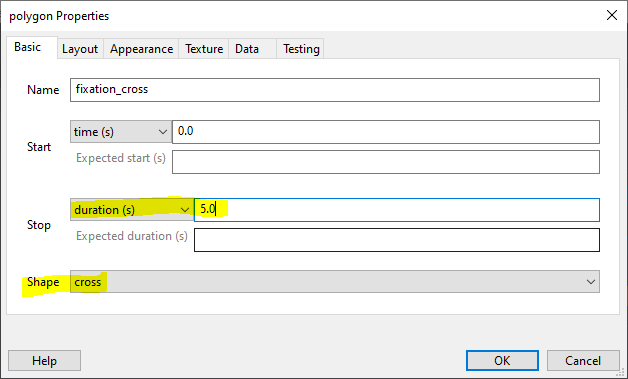
First of all, each component needs a unique name that identifies it. You define it in the Name section of the Basic tab. Here let’s call this target. In the same tab, we can also define when to start presenting the component and when to stop it.
The duration is relative to the beginning of the routine. For instance, with these default parameters, the target will commence right at the beginning of the trial routine and will last for 1 second.
Defining the timing of a component is a vital aspect of a study, and Psychopy offers different ways to do this. However, there are some technicalities that I don’t want to discuss now (for instance, it might be better to define the timing in frames, as we do in the in-person bootcamp, but this is not always the best solution). For the moment, let’s leave everything as it is. To define which letter to present, we need to modify the Text field. Everything you write in this field will appear on the screen. So let’s write R here.
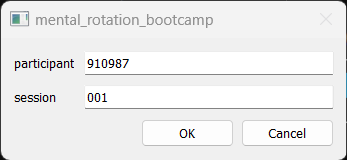
Amazing! Let’s click OK and check what we have done! Before we run the experiment, we need to save it. Click on save (the floppy disk icon or Ctrl+S) and save the file somewhere on your PC. Once you have done this, click on the Green PLAY button (Run the experiment). When you do so, a small window will appear asking for the participant and session number. You can leave everything as it is for now. When you run a real experiment, you will change this accordingly (e.g. P01 for participant 1, etc…).
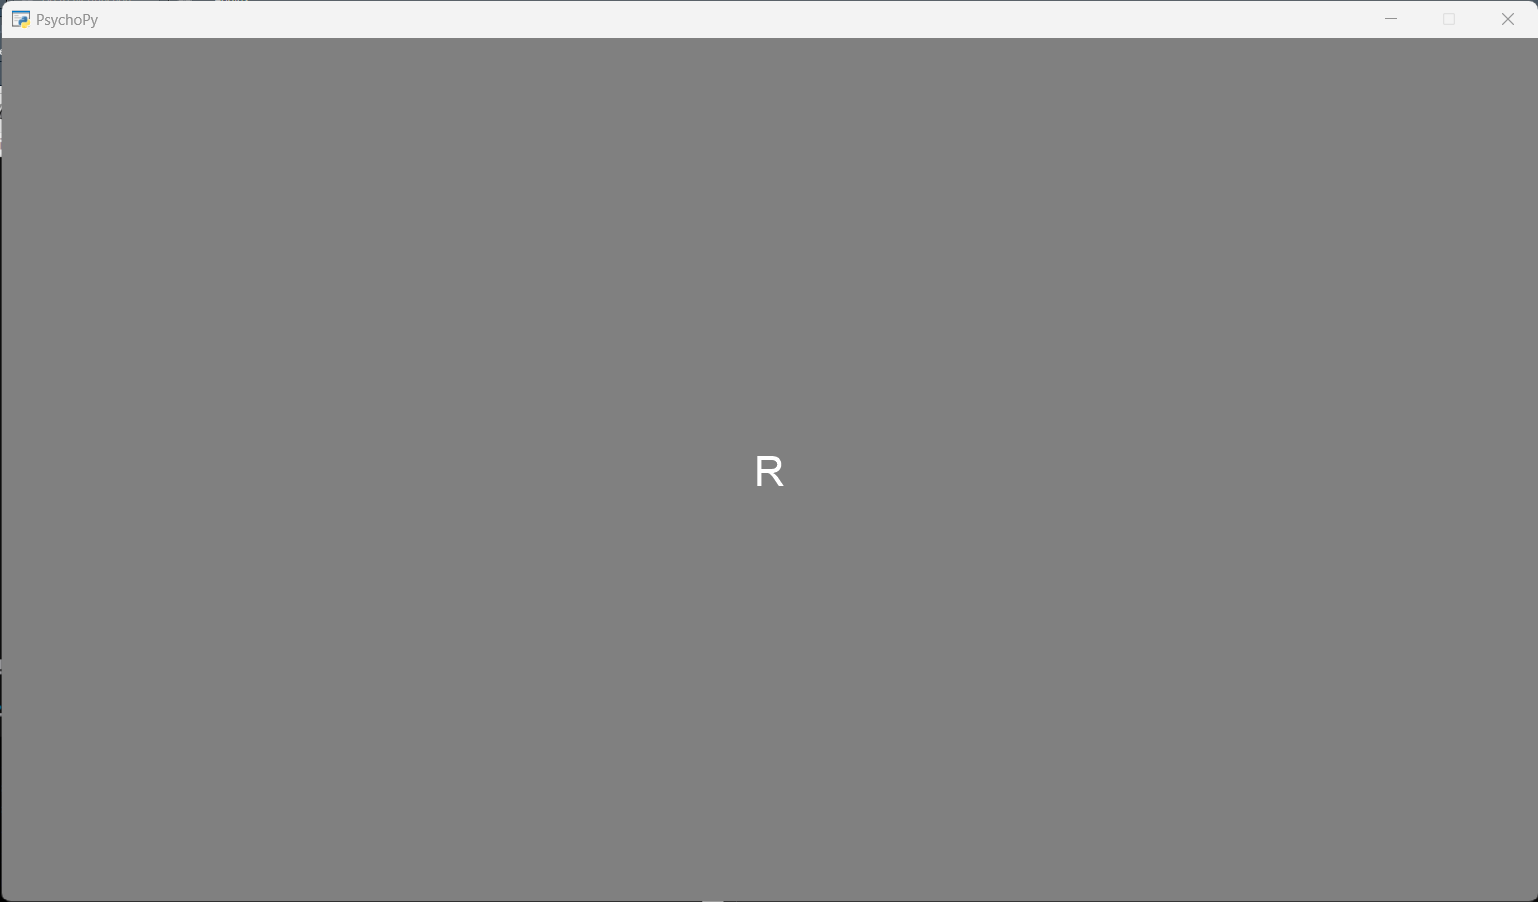
Once you press run, you should see this screen for about one second:
Ok, if everything is working fine, we can now change some more settings.
We want to present the target on the left side of the screen, and we might also want to increase the size of the letter. Let’s do this. Back in the builder window, click on the target component to open its settings. Before we used only the Basic tab, but more tabs are available. Click on the Layout tab. Here we can define the position, orientation and other elements important for a text component (note that a text component can be used to present entire sentences or paragraphs).
As said above, we want to present the target in the left side of the screen. To do this, we need to modify the Position [x,y] field under the Layout tab. Here we need to pass two values as a touple. These values are the X and Y coordinates of the screen where we want to centre our stimulus. Right, but how can we know the values of these coordinates? To understand this, we need to digress a bit into the world of Psychopy’s coordinate system.
Digression on Psychopy coordinate system
Psyhcopy treats your screen as a Cartesian plane or a battleship grid if you want. The grid size depends on your screen - now you know why we defined the screen before starting our experiment. The origin of this grid, the [0,0] point, is the centre of the screen. You can see that the R in our first test has been presented in the middle of the screen. Indeed, if you look at the default value in the Position [x,y] field of the text component, you will see [0,0].
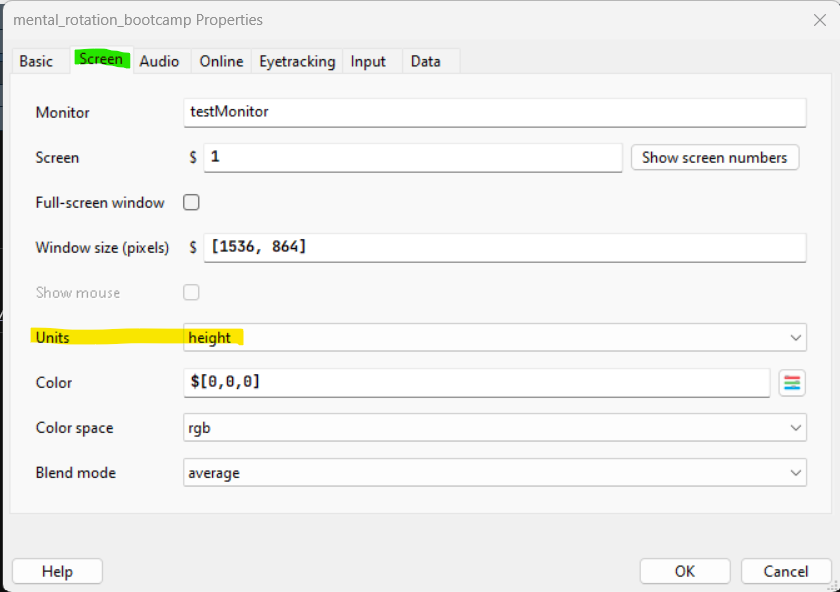
Having said this, we need to focus on which units is the size of the grid is expressed. You might think pixels as this is how we defined the screen size. But you’ll be wrong. Psyhcopy default unit of measure is height. You can see this by opening the settings and going to the Screen tab. Here you see a field called Units with the value set to height.
You can find an explanation of the height and all other possible units here. If you read there, you will see that the height is a pretty weird unit system which depends on the window size where the experiment is presented. Regarding pixels, defining our parameters with them means that our stimuli size and location will change depending on the specific screen we use. What if someone else wants to use our script to replicate our experiment? Or maybe you need to test the study using different PCs/screens.
To avoid these problems, we will use the degree unit. This unit specifies location and sizes in terms of degrees of visual angle. In simple terms, the degree of visual angle reflects the angle an object subtends to the retina (see here and here for more details). The crucial element with the degree of visual angle is that its value depends on the object’s distance from the eye.
Do you remember that we have set the viewing distance for our monitor?
I have asked you to set the viewing distance to 57cm. This is because at this distance, one degree of visual angle corresponds to roughly 1cm. Thus, when we set the sizes, we can think in terms of centimetres. Using the degrees of visual angle is excellent as we can ensure that the stimuli will be perceived in the same relative position and size even if we change monitors. If you read some literature on visual perception, you will notice that the majority of authors report their stimuli dimensions in degrees. This is the reason why.
Fantastic! So let’s set the default units to degrees by selecting deg in the Units field of the Settings window (see picture above). In doing so, all units will be now expressed in degrees of visual angle by default.
Back to the target stimulus
Fantastic! With the units covered and properly set, let’s open the target component window again and let’s go to the Layout tab. Before the digression, we were modifying the Position [x,y] of the target. If the digression is clear, to present the target on the left side of the screen, we need to pass a negative value to the X coordinate (hint: the centre of the screen is (0,0). Positive values are right and up, negative values are left and down). As we use deg as units, we approximate them as centimetres, so let’s say we will present the target around 15 degrees on the left. We pass the value (-15, 0). We leave the Y coordinate as 0, as we want the letter midway on the vertical axis. Press OK, save and then run the experiment again.
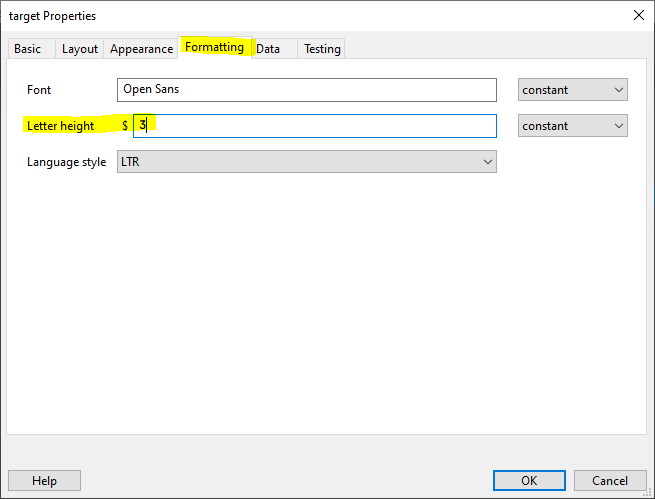
Uhm…it is possible that the R has disappeared on the screen, or it might look quite small, just a few pixels, maybe. Can you think why this is the case? The culprit is the units of measure. As we have changed the default units to degrees, now everything is expressed in the same way, even the font size. Thus, we need to change this. Head back to the target component and click on the Formatting tab. Here you can see a field called Letter height. By default, its value is set to 0.05. Let’s change this to 3 (aka 3 degrees).
Press OK and run the experiment. Now everything should look how we want it.

Note that you can override the default units for some parameters of most components. To do this, look for a field called Spatial Units or similar. By default, this is set to from exp settings, but you can change it if you’d like. However, note that doing this might create problems when you are working with multiple components and routines. It is easier to use the same units everywhere.
Adding the second stimulus
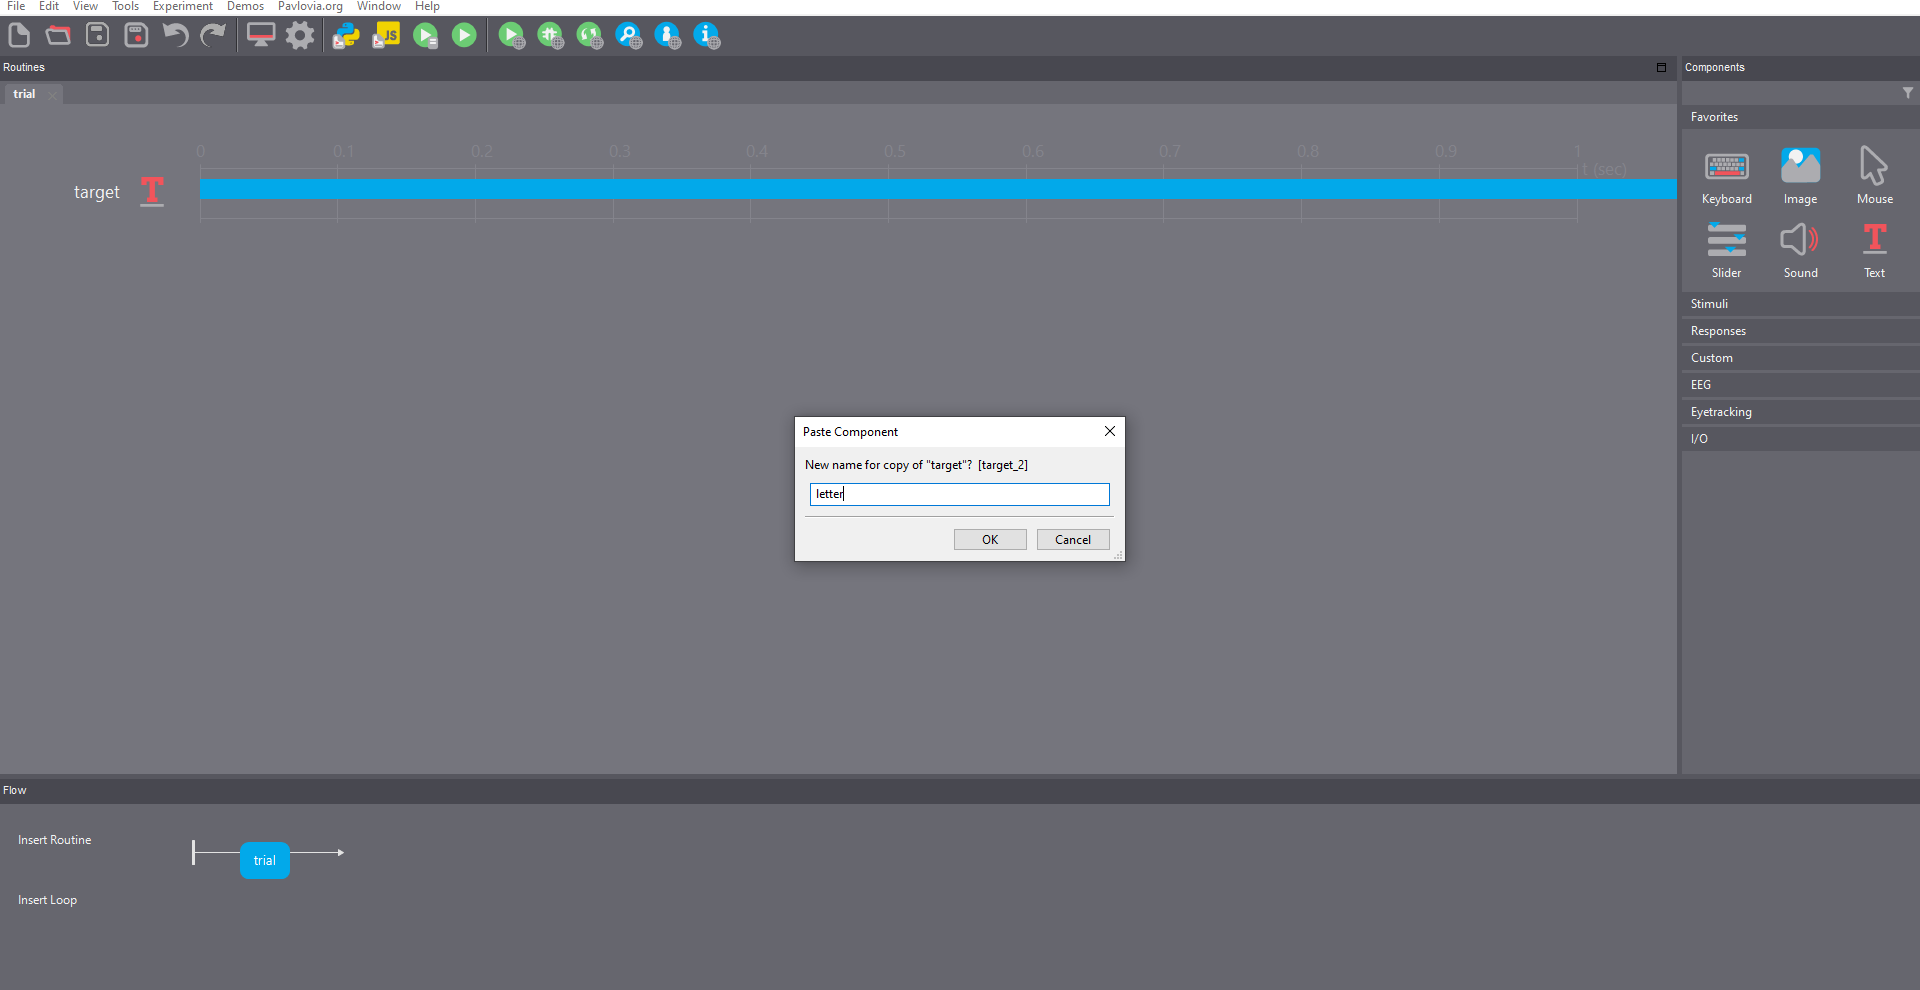
We now want to add a second stimulus on the right side of the screen. There are two ways to do this. One is by following the same procedure above. Add a new text component to the trial routine, give it a name, set its value (R again) and set its parameters. However, we can also use a shortcut. As we want to replicate the same stimulus as the target, why not copy and paste that? Psychopy allows us to do so.
Right-click on the target component. A menu should appear, and the first entry is copy(name_of_component). Click on copy. To paste, you can do a few things:
- Right-click on an empty space of the window and select paste(name_of_component)
- Click on
Experimenton the top menu and select Paste Component - Press Ctrl+Alt+V
Either way, Psychopy will ask you to provide a new name for the new component. Remember that each component must have a unique name! Let’s call this letter.
This will be added underneath the target component.
Note that the order of the components is important! Psychopy will draw components in the same order as they appear on your builder screen. Thus, here, it will draw the target first and then the letter. This is not really relevant at the moment, but it could be critical in other settings. For instance, if we would like to show one image on top of the other, we need to set the background image as the first (top) component and the foreground as the second (bottom) component.
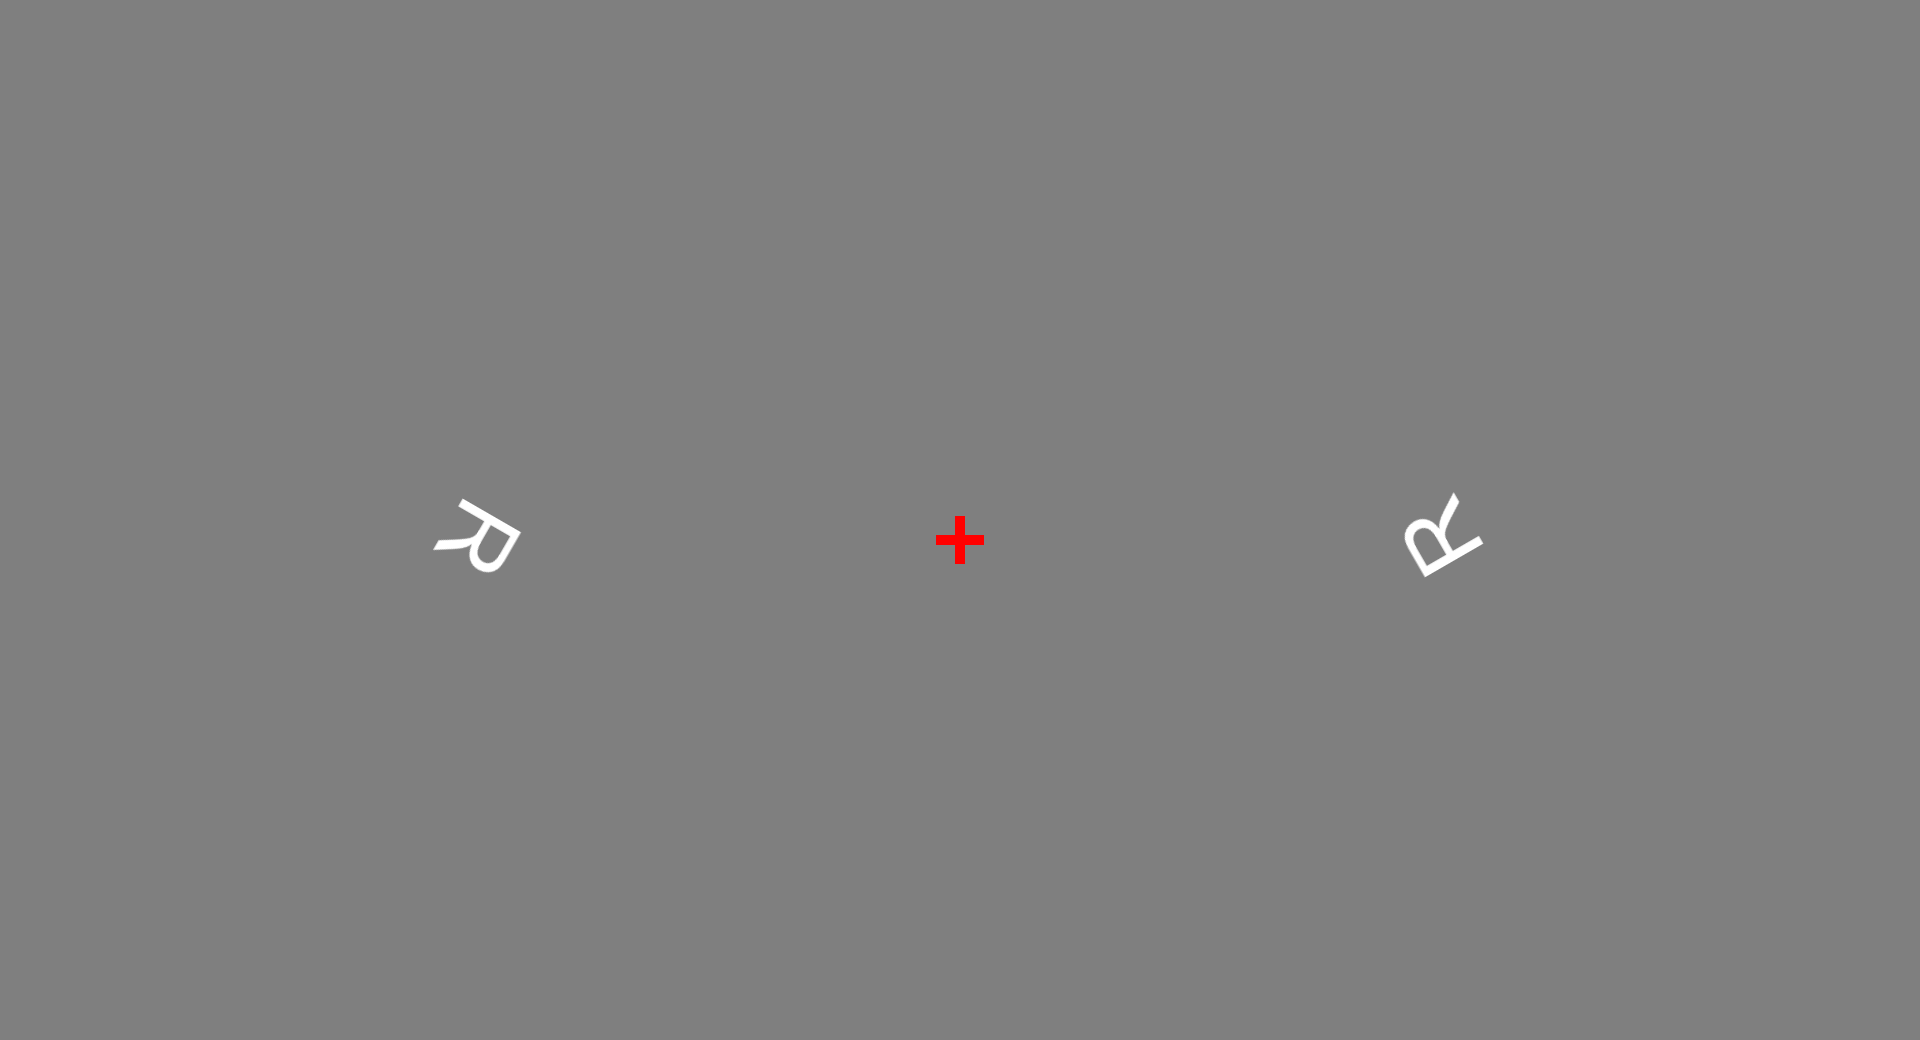
At the moment, the letter component is exactly the same as the target component. So, let’s open the letter component properties (left-click on in), and in the Layout tab change the Position [x,y] from (-15,0) to (15,0). This way, the two letters will be presented symmetrically on the two sides of the screen. If you press OK and run the experiment, you should see this:

Just that we are here, why don’t we change the rotation of the angle of the letter component? We can do this simply by opening that component’s properties, going into the Layout tab and modifying the Orientation field. This is always expressed in degrees, from 0 to 360. As a test, let’s put the letter component upside down by setting its Orientation to 180. The result should be this:

This looks nice. However, how can we programmatically change the rotations for each trial? How do we even create multiple trials? We cover this in the next section.
Traials and Conditions
In this experiment, we want to manipulate both the target stimulus and the other letter orientation for each trial. One naive way to do this is to create multiple routines, each one containing two stimuli with different orientations.
This approach would work, but it has a few shortcomings:
- It does not allow for randomization: each participant will be shown the same trials in the same order
- It makes maintenance of the experiment and troubleshooting hard: if you need to change one parameter in each trial, you would need to manually go over each routine and modify it.
A better approach is to use a loop to reiterate the same trial routine over and over while modifying the stimuli parameters at each iteration. To insert a loop, we can just click on Insert Loop in the Flow panel. Once you do this, you will see a dot appearing on the flow line next to your trial routine. If you move your mouse, you will see the dot moving too. Move the dot where we want the loop to begin and click there. Then, we move the mouse again and click where we want to loop to end. Loops will always start and end before and after the routines, never in the middle. That is, you can only loop over entire routines (or series of routines). Note if you have only one routine in the flow, then you do not need to click a second time, Psychopy automatically sets the loop to end after the routine itself.
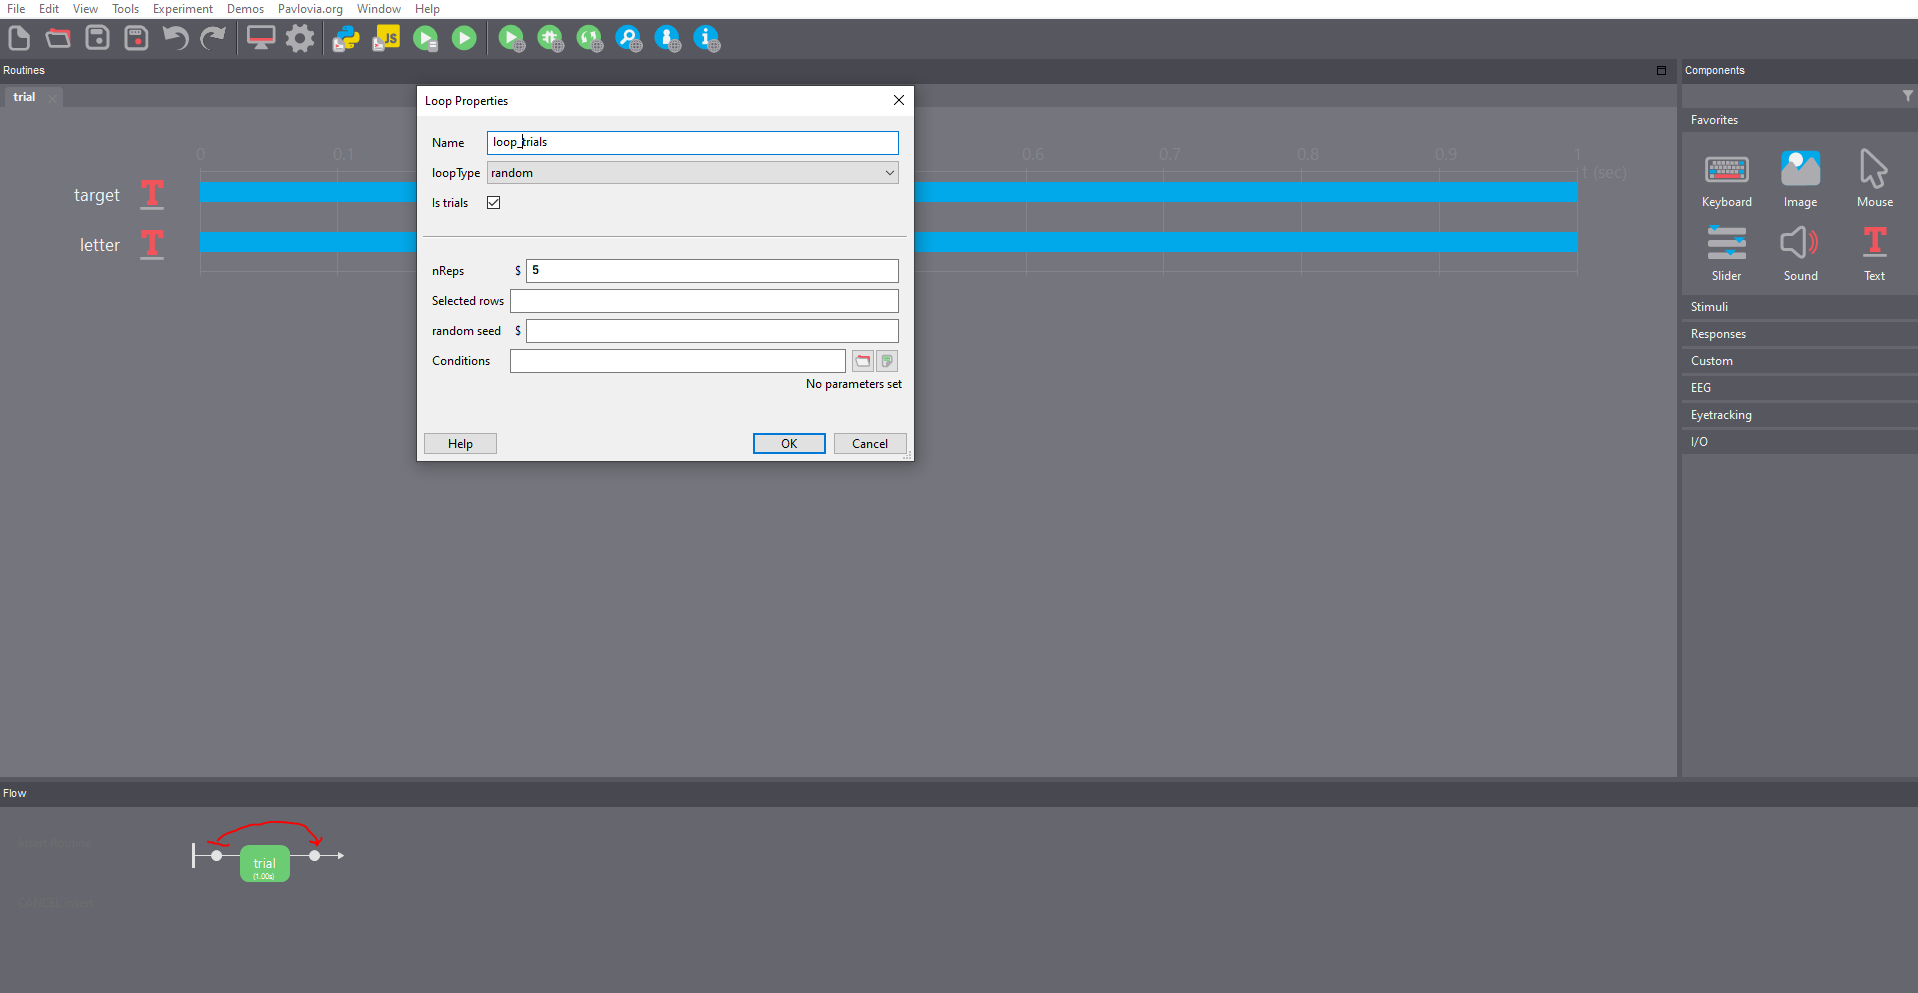
After selecting the loop’s starting and ending points, a new tab will appear. A loop is like a component, so it will need a name - here loop_trials - and it has its own properties. The most important are:
- loopType: this controls the randomisation of your trials. Leave this as random, but you can read more about the other options here
- nReps: how many times you want to loop over your trials. Note, this is not the number of trials but the number of repetitions of all the trials! For instance, if we define 100 trials and we leave this value to 5, then we will present 500 trials (5 times 100 trials).
- Conditions: here we should pass the filename of a file containing all the trials specs we want to run. We will create this soon.
For now, set the nReps to 1, press OK and save. We need to talk about file path.
Digression on file organisation
We need to briefly talk about how to organise files in Psychopy. To do this, head over to the folder where you have saved your experiment. Here you should see three files:
- your_exp_name.psyexp: this is the builder file, the one we are working on with the GUI
- your_exp_name_lastrun.py: this is a Python file automatically created by Psychopy every time you run an experiment
- data folder: this folder is created by Psychopy to store the data related to each experimental session. Every time you run an experiment, 3 new files are added to this folder. As we have run the experiment a few times to test it, this folder should contain a few files. The three files have the same name but different extensions for each session. The name, as of now, starts with the participant id number, is followed by the experiment name and ends with the date and time when the session was run. Of these three files, the most important is the csv file, as it contains all the data necessary to analyse an experiment. For instance, the time at which each component started and ended, the participants’ response times, whether a response was correct or not, etc… More information is provided here
The folder containing these files is your main directory, and it is included in the search path of your experiment. Every file included here can be called within the Psychopy experiment if necessary. For instance, if you want to present some images (hint: use the image component), you want to put them in this folder, maybe in a subfolder called images.
In our case, we want to create a file containing the details of the conditions of each trial. What I like to do for my experiments is to create a subfolder in my main experiment directory called conditions; there, I store the file/s I need to tell Psychopy how to run each trial.
Condition file
Sweet, but how do we create a condition file? This is pretty simple, open OpenOffice Calc or Excel (if you don’t want to use opensource software). We will use this spreadsheet to define the parameters of the trials. Note:
- Each row will define a different trial
- Each column will define a different parameter
- This data will also be reported in the output file
This might seem tricky, but once we have created some trials, it should look straightforward (although more complex experiments might have complex condition files too).
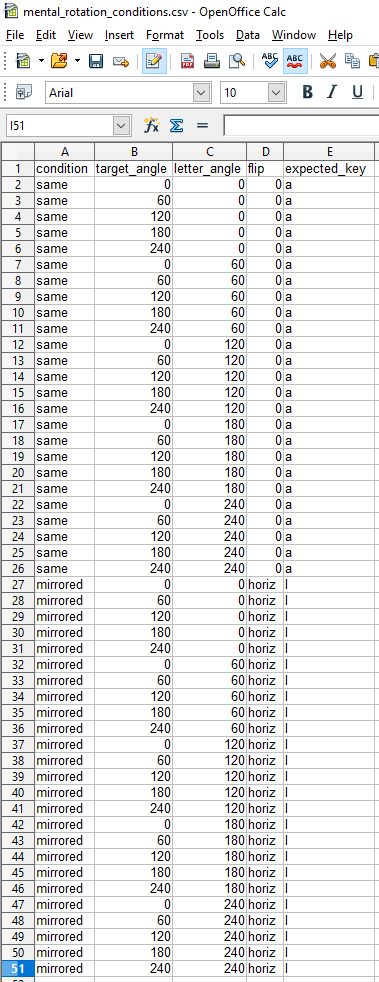
We first want to keep track of which condition each trial is member. In our case, we have two main conditions, namely, same and mirrored, depending on whether the two stimuli are the same or are the mirrored version of each other. Thus, we name the first column condition. Secondly, we want to change the angle of rotation of the target letter so as not to present it straight up all the time. We call the second column target_angle. We also want to be able to define the angle of rotation of the second stimulus, so we call the third column letter_angle. The spreadsheet should look like this:
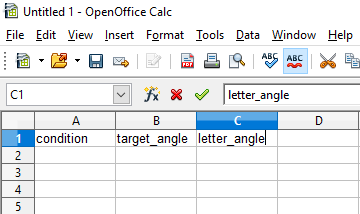
Note that the parameter names must always go in the first line of the column and they cannot contain space.
For this experiment, we want to present the target letter at five possible angles, 0, 60, 120, 180, 240 degrees. So we add these values, each one on a new line of the spreadsheet, in the target_angle column.
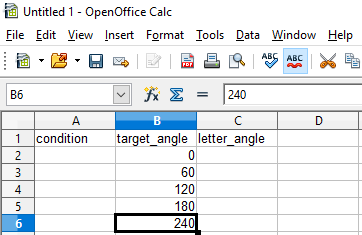
Now we need to think of the angle of the second stimulus. We want to present the second stimulus rotated at the same five angles as the target. However, we want to cover all the scenarios so that every combination of angles is covered. For instance:
| Target_angle | Letter_angle |
|---|---|
| 0 | 0 |
| 60 | 0 |
| 120 | 0 |
| 180 | 0 |
| 240 | 0 |
| 0 | 60 |
| 60 | 60 |
| 120 | 60 |
| 180 | 60 |
| 240 | 60 |
| 0 | 120 |
| 60 | 120 |
| … | … |
So now we need to create this. Let’s start by creating the conditions where the second stimulus is presented with a rotation of 0 degrees.
Then, we can copy and paste these lines, and modify the letter_angle so to cover all the combinations (0, 60, 120, 180, 240)
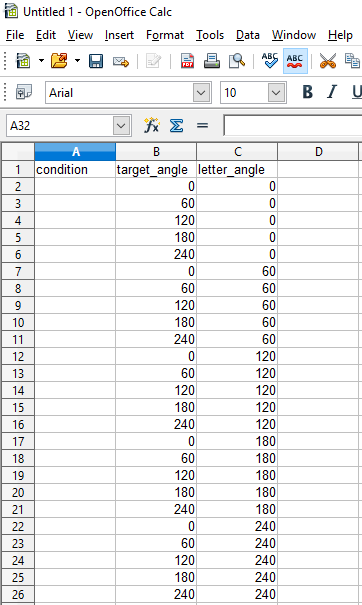
Here we have defined 25 different trials, each with a different combination of angles of rotation.
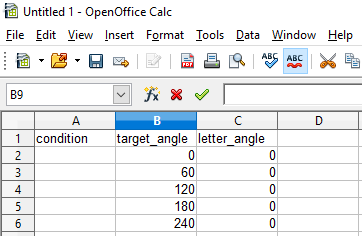
For the condition, let’s start with the same condition. Here, we can simply add the label same in each row of the 25 trials under the condition column.
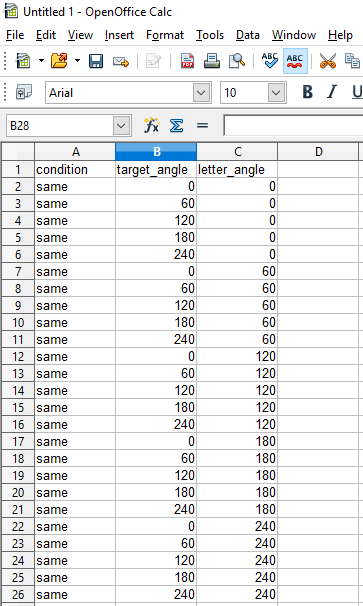
Currently, the condition column contains only a label to remind us which condition these trials belong to. We still need to specify that the two stimuli must be the same - they should not be mirrored (flipped). So, let’s add a new column and call it flip. As the stimuli here should not be flipped, we provide a value of 0 for every trial. Do not worry about this value now; we will use it later.
Ok, we have defined the trials for the same condition. Now we need to define the trials for the mirrored condition. The only difference between the two will be the flip; thus, we can copy and paste our trials to add 25 new trials. We will change the condition label to mirrored to remind ourselves that these trials are part of a different condition.
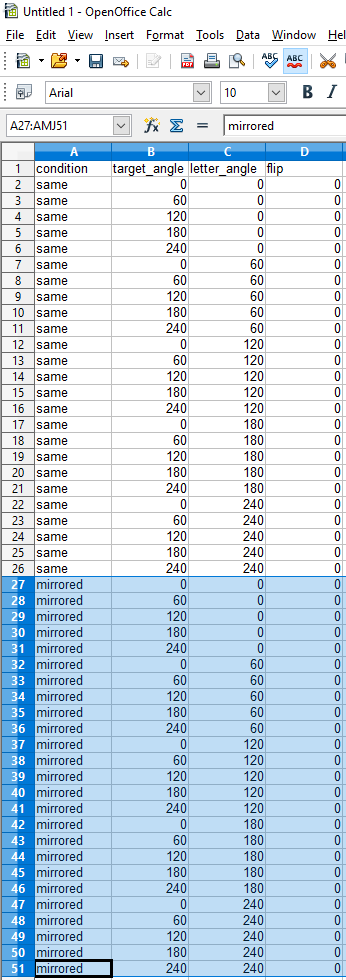
Then, we need to modify the flip value for these trials. Here we will use the value horiz as it is a keyword that Psychopy understands when dealing with flipping a stimulus. We will see why later.
Fantastic! We can now save this file as a csv file in the experiment directory. Try to always use the csv format!
Using the condition file in Psychopy
With our condition file saved in the experiment directory, we can go back to Psychopy builder. The last thing we did was to add a loop to our trial routine. Now, we need to load in Psychopy the condition file so that we can use it. The condition file is loaded by opening the loop properties (click on the loop name) and clicking on the folder icon next to the Conditions field. By doing this, you can navigate to your condition file and select it and click Open.

If everything is correct, you should see the following sentence underneath the Condition field: 50 conditions, with 4 parameters [condition, target_angle, letter_angle, flip]. Press OK.
This loads the file and makes the parameters available to Psychopy. That is, we can use the parameter names as variables to define the settings of our components. In our case, we have four parameters, so we can use these four variables as needed. Let’s see how.
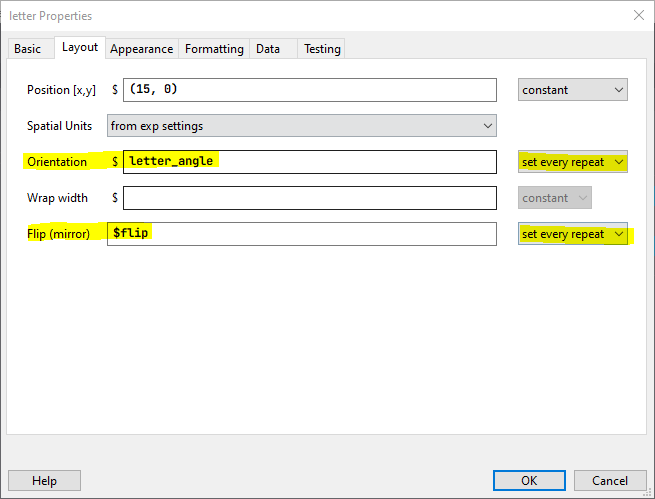
To begin with, we want to modify the angle at which the target and the other letter are presented at each trial. To do this, we open the target Properties window, and we go to the Layout tab. At the moment, the orientation is set to 0. However, as you can see, next to the Orientation field, there is a $ sign. This symbol is used by Psychopy to indicate that a variable can be used instead of a fixed value. Whenever you see this symbol, you can pass a variable as long as it has been defined somewhere - in our case, in the condition file. The variable/parameter containing the angle values for the target was called target_angle in the condition file, so we pass this name here. Then, we also need to tell Psychopy that this variable needs to take up a different value (update) every trial. To do this, click on the menu saying constant next to the Orientation field. Here you will find three options:
- Constant (default): the value of this parameter is fixed throughout the experiment
- Set every repeat: change the parameter value every time the routine is run
- Set every frame: change this value every screen refresh. If your screen has a refresh rate of 60Hz, then the value of the parameter will be updated 60 times per second.
Here we want to modify the rotation for each trial, so we set this value to Set every repeat. Now, when we run the experiment, Psychopy is going to load the condition file, and it will read the values in it. Because we have a loop around the trial routine, it will repeat this routine as many times as the number of trials (rows) defined in the condition file (assuming that the nRep parameter of the loop is set to 1, otherwise it will repeat the routine nRep x n_trials). For each trial (repetition of the routine), Psychopy will use the values defined in one of the lines of the condition file to set the parameters we have defined. In this case, it will use the values in the target_angle column to set the Orientation of the target letter in each trial.
How are the values selected from the condition file? Well, as we defined the loopType field of the loop as random, then Psychopy will read the lines randomly without repetitions. In other words, it will present the 50 trials in random order.
If you run the experiment now, you should see the target letter changing angle after every second.
Amazing, let’s now set all the other parameters. Firstly, we want to set the angle of the other letter to update each trial as well. To accomplish this, we can simply repeat what we did above. Open the letter properties, set the Orientation field to letter_angle (the parameter name used in the condition file), and set this field to update every repetition (Set every repeat). We also need to define whether the two letters are the same or one the mirrored version of the other. To do this, we can work on the Flip field of the letter component, just underneath the Orientation field. At the moment, this is set to None. You might also notice that this field does not have a **\(*** symbol next to it. So, to pass the value we have defined in the `flip` column of the condition file, we need to write *\)flip. This tells Psychopy to use a variable called flip defined in the condition file. You might also remember that for the same condition, this value was set to 0, while for the mirrored condition was set to horiz. The reason why we did this is that you can use the keyword horiz here to flip a text component, well, horizontally. Note, if you over your mouse on this field, you will see all the possible values you can pass to this field. Again, as we want this value to change for every trial, we set it to update every repeat through the menu next to it.
Great, now our experiment should run 50 trials, 25 of them of the same condition and 25 of the mirrored condition.
Collecting answers
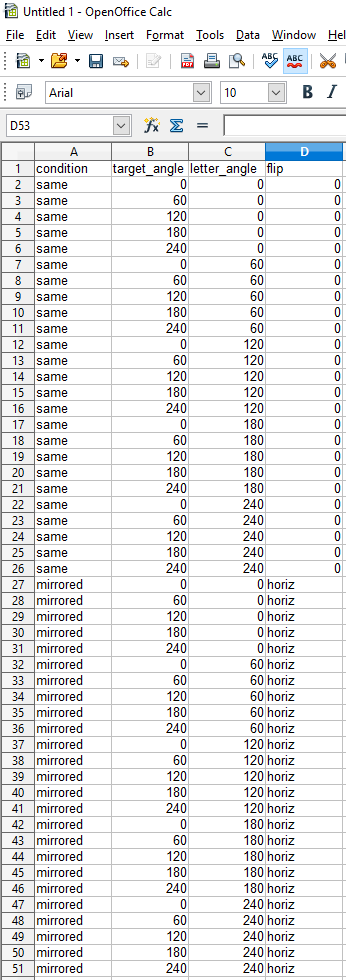
The task of this study is to report whether the two letters presented at any given time are the same or not (mirrored versions of each other). As an example, we will ask the participant to press the letter A if the letter on the right is the same as the one on the left. If not, the participant should press the letter L. Let’s begin by defining these settings in the condition file. Open the csv file we created before and add one column that we will call expected_key. As we said, when one of the same trials is presented, we will expect the A key to be pressed. Thus, we write a in the expected_key column for all the same trials. Conversely, when a mirrored trial is run, we expect the letter l to be pressed. Thus, we will add l in the expected_key column for those trials. The condition file should look like this:
Focus on the last column.
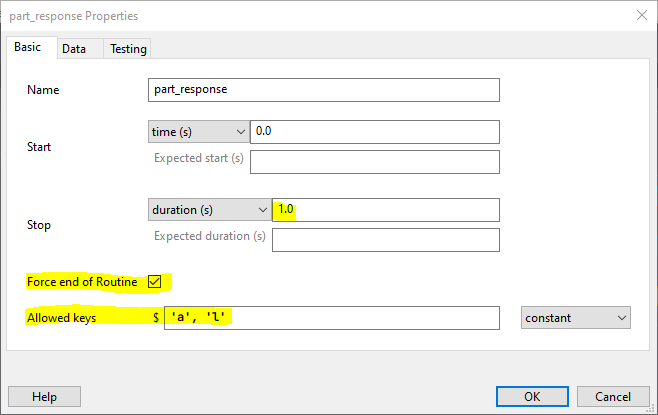
Great, we have defined the keys we expect for each trial; now, we need to add a way for Psychopy to record key presses. Go back to the builder window. Here we need to add a keyboard component to the trial routine. In the Components panel, under the Responses menu, you will see a Keyboard component. Click on it to add it to the routine. As we did for the stimuli components, we need to provide a unique name for this component. I’ll call it part_response. We want the component to last as long as the visual stimuli, so we set it to start at time 0.0 (default), and we set the Stop time to 1.0 (seconds).
Now we need to set fields specific to the keyboard component. Firstly, you see a thick box called Force end of Routine. When this is checked (default), a valid key press will end the trial (routine), and the next trial will commence. If we are at the last trial, the next routine in the flow will start, or the experiment will end. We want this behaviour, so let’s leave this checked. Beneath this, you see an Allowed keys field. Here we define which keys Psychopy will look for. If you press a key not contained in this list, nothing will happen - except for the Esc key, which will always terminate the experiment whenever pressed. In our experiment, we want participants to press either a or l, so we write these keys. Note that each key needs to be reported with straight quotes (’’), and they need to be separated by a comma.
These settings will allow Psychopy to record keyboard responses. However, we also need a way to record whether the answers were correct - the participant pressed the expected key - or not. Although we could figure this out by comparing the expected key with the pressed key using the output file, Psychopy allows us to verify this automatically and store this information in the output csv file.
If you go on the Data tab of the keyboard properties window, you’ll see a Store correct field. Check this and the Correct answer field will be unlocked. The Correct answer is the field where we tell Psychopy what the answer we expect is. We have defined this answer in the condition file, so guess what we need to pass here? Yup, the name of the column containing the correct answer preceded by a **\(*** symbol. Thus, let's write *\)expected_key. Basically, we are telling Psychopy that the correct answer for the current trial is the one that can be found in the condition file in the defined column.
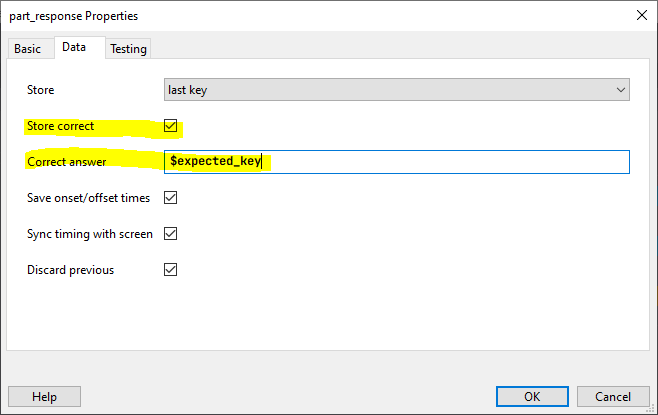
Leave the other parameters as they are. But if you are curious, check here
Fine-tuning
Before we run a test, let’s fine-tune the experiment and add a fixation cross. First, we would like the trials to last a bit longer (this is a challenging task). Let’s say that a trial will last until a response is provided or for a maximum of 5 seconds. To do this, we just need to change the Stop field of each of the three components from 1 second to 5 seconds. Because the keyboard has the option Force end of Routine selected, the trial will end if the a or l keys are pressed within 5 seconds.
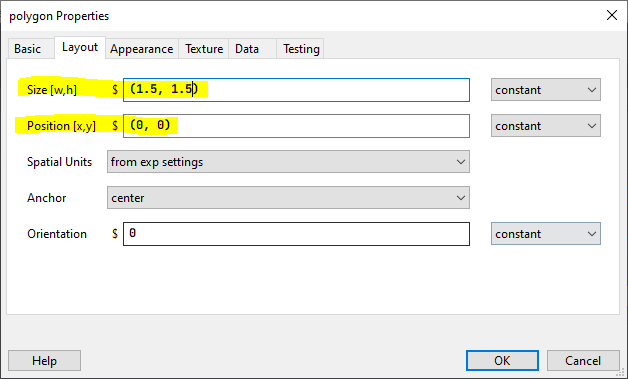
Now we want to add a fixation cross in the middle of the screen. Psychopy offers a handy component to do this. Under the Stimuli menu of the Components panel, you will find a Polygon component. Click on it to add it to the routine. As always, we give it a name (fixation_cross), and we set the start and stop times as the other components (0 sec to 5 sec). Now, we set the Shape field to cross. We also need to change the set size, position and colour of the cross. Go to the Layout tab and modify the Size [w,h] field by passing a touple with the width and height of the cross.
Remember, we are working with degrees of angle!
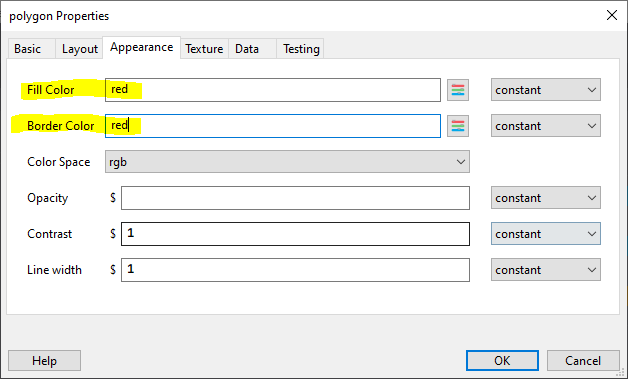
Here I set the cross to subtend 1.5 degrees of angle (around 1.5 cm) by passing (1.5, 1.5). We will leave the position as (0,0) as that is the screen’s origin in the Psychopy coordinate system. Finally, click on the Appearance tab and change the Fill Color and Border Color from white to red.
Please, play around with all the other fields to learn what they do and what you can achieve. You can also read some more here. Now, if you run the experiment, you will see something like this:
Adding some instructions
Before we look at the output file, let’s make this experiment a bit more user-friendly and complete. Let’s add some instructions before the trials start. This will give us the opportunity to add a new routine and review the loops.
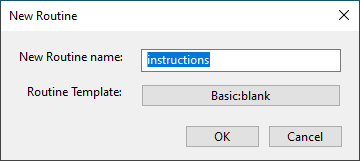
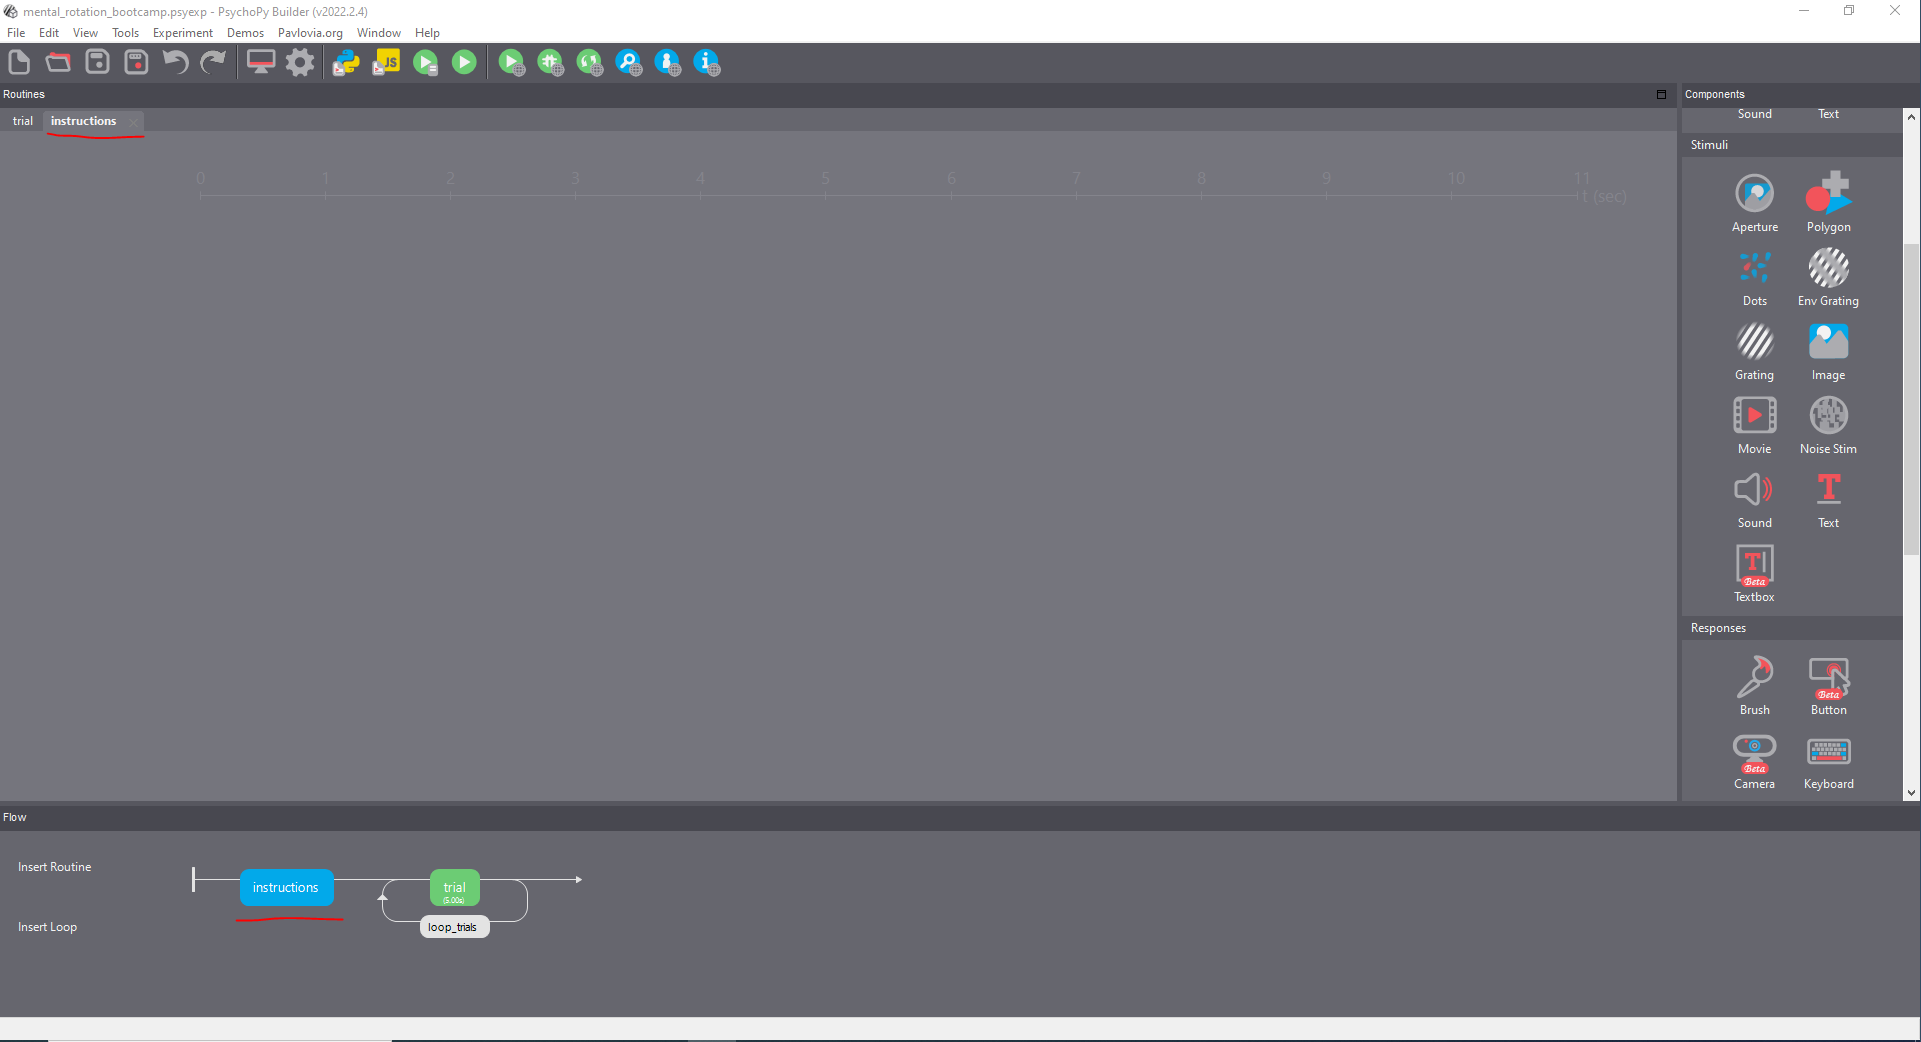
Let’s add a new routine in the builder window by pressing Insert Routine in the flow panel. Click on (new) and then name the routine instructions.
Press OK, and you will see that a dot appears on the flow arrow. As for the loop, you use your mouse to select where you would like to add the new routine in the flow. We click before the trial routine, outside the loop!. Think about what would happen if you added the new routine inside the loop.
At the moment, this is an empty routine. We need to populate it with some instructions. The following is my personal approach, but other possibilities exist. As you will see, I exploit the loops to present different text slides without having to create multiple components. Let’s see how it is done.
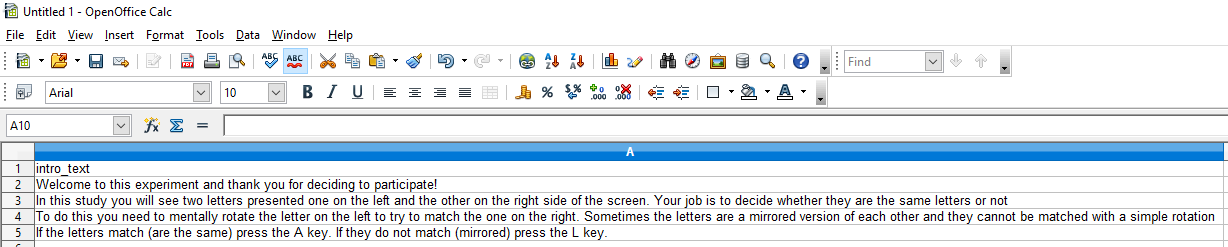
Firstly, we need to create a brand new condition csv file. Open OpenOffice Calc or Excel and create a new spreadsheet. Here we need only one parameter, and we will call it intro_text. The idea here is to present the instructions as self-paced trials to have the text nicely spread and not crowded into one slide. Thus, we will divide the instructions into different rows of our new spreadsheet. For instance, here, we will have four rows containing the following text:
| row | text |
|---|---|
| 1 | Welcome to this experiment and thank you for deciding to participate! |
| 2 | In this study you will see two letters presented one on the left and the other on the right side of the screen. Your job is to decide whether they are the same letters or not |
| 3 | To do this you need to mentally rotate the letter on the left to try to match the one on the right. Sometimes the letters are a mirrored version of each other and they cannot be matched with a simple rotation |
| 4 | If the letters match (are the same) press the A key. If they do not match (mirrored) press the L key. |
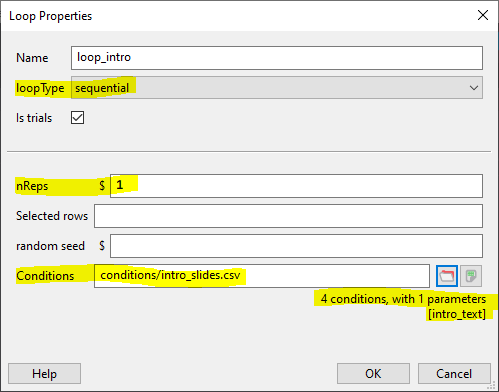
Save this file in the same directory as the condition file. Now head back to the builder window and add a loop around the instructions routine. Called this loop_intro, set the nReps parameter to 1 and, most importantly, set the loopType parameter to sequential sot that Psychopy will go through the rows of the instruction csv file sequentially, from the first one to the fourth one. In the Conditions field, navigate to the just created csv file and select it.
Sweet, now we need to set up something to display our instructions. This is simply a Text component. So, go ahead and add a new text component to the instructions routine. Call this component intro_slides and set this to start at time 0.0. Here, we want the text to be presented for as long as the participant wants. To do this, we need to leave the Duration field empty. In the text field, we need to tell Psychopy to use what we wrote in the csv file. Do you remember how we tell Psychopy to use a variable created in a file? Yup, by using the **\(*** symbol followed by the variable name in our file. In this case, In the `Text` field we write *\)intro_text and then we set this to update every repeat.
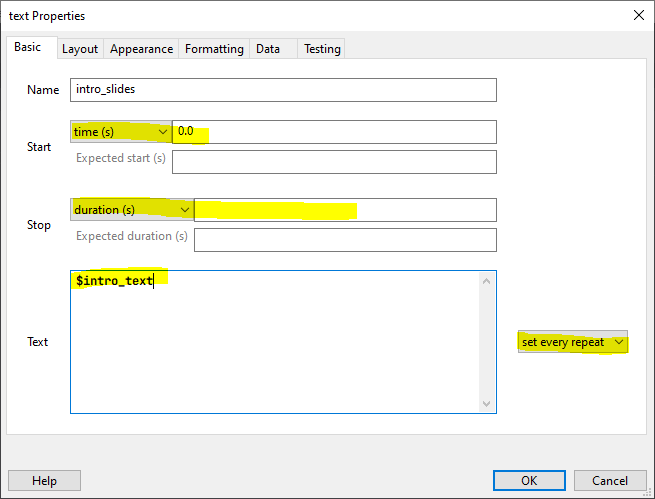
I leave it to you to change the font size and other options so you can play around with those. Remember what units we are using!
Finally, we need a way for the participant to move from one slide to the next one. We will tell the participant to press the space bar to do so. So, let’s add a Keyboard component and set it to accept only the spacebar and terminate the current trial (slide) when that key is pressed.
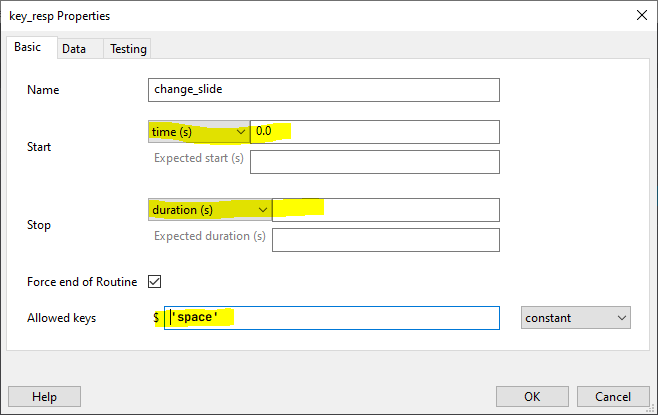
Note that the duration is infinite to match the infinite duration of the intro_slide component. This means that Psychopy just waits for the participant to press space.
Using code to extend the experiment
This section is a bit more advanced, but it will show how we can use Python to expand our experiment. As an example, we will fix a bug that is currently affecting our experiment.
Yup, the experiment doesn’t work properly. If you run it, you’ll notice that the letters are always flipped (or always not flipped). This is caused by a bug in the Text stimulus, so it’s not your fault. However, we need to fix it.
Luckily, this issue has been discussed before in the Psychopy Discourse - see here. Always check here if you are encountering some issues or if you are stuck. Chances are someone else already asked the same question.
Go over the trial routine. Here we need to add a new component. Look inside the Custom menu on the Components panel. Click on Code. This component allows you to add custom Python code inside your experiment at different moments as required. Once you click on the component, a new window will appear. As this is a component, it needs a unique name, let’s say my_code. You can also see 6 tabs:
Before Experiment: Here we can add all the code that should be run before everything else in the experiment. Usually, we use this tab only when we need to load specific Python modules that do not ship with Psychopy.Begin Experiment: Here we add code that needs to be run at the beginning of the experiment. For instance, we might want to define some variables that need to be used throughout the experiment for multiple routines.Begin Routine: The code added here will be run every time the current routine (where the code component is added) starts. We can add code here to update specific parameters every time a routine starts againEach Frame: The code added in this tab will be evaluated each time a new frame is drawn on your screen. This offers us a powerful way to manipulate stimuli, but we need to consider what code we evaluate here. Suppose the code requires too much time to be executed. In that case, it might not be evaluated precisely every one frame, which could potentially create problems in our timing.End Routine: The code here will be evaluated just before a routine is going to endEnd Experiment: the code added here is evaluated at the end of the experiment.
In the Begin Routine tab, we need to add the following lines (discussed in the bootcamp):
# Fix the bug
if flip_condition == 'horiz':
    letter.flipHoriz = True
    letter.flipVert = False
else:
   letter.flipHoriz = False
   letter.flipVert = False
Now the experiment should run smoothly!